Types of Vernier Caliper: Parts, Working Principle, Least Count & Zero Error
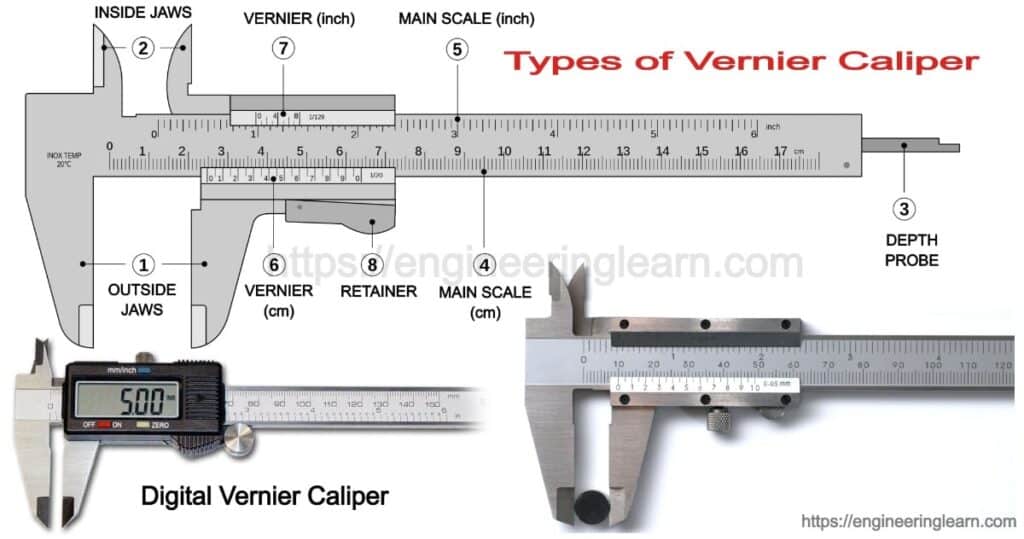
What is Vernier Caliper?
Types of Vernier Caliper: Parts, Working Principle, Uses, Least Count & Zero Error :- A Vernier caliper is referred to as an instrument which is commonly used for a variety of accurate measurements, and is not necessarily related just to the engineering manufacturers. There are three types of Vernier caliper which are commonly used in the laboratory in order to measure the lengths of the small objects accurately precisely which cannot be done using a meter scale or any other instrument. So, let’s scroll down to learn more about the types of Vernier caliper.
- Type A
- Type B
- Type C.
The foremost use of any Vernier caliper is to measure the internal as well as external diameter of an object. The word caliper is derived which means any instrument with two jaws which is used to determine the diameters of objects. This is the instrument which is well known for obtaining accurate measurements which are highly required for the scientific experiments.
The principle on which a Vernier caliper works is that whenever there are two scales or divisions which are slightly different in size, then the difference within them is used so that the accuracy of the measurement can be increased.
Parts of Vernier Caliper
As a Vernier caliper is high in demand at places where there is requirement of a highly accurate measurement. So here comes a need to properly know the elements of Vernier caliper which are mentioned below. So, the main elements of the Vernier caliper are as follow:
- Main Scale
- Vernier scale
- Thumbscrew
- Lock screw
- Depth Rod
- Fixed jaw, and
- Sliding jaw
- Description
1. Main Scale: ( Parts of Vernier Caliper )
Vernier caliper mostly consists of two steel rules which can slide along with each other. One is observed to be a long rectangular metal strip which has a fixed jaw on one end and is graduated in inches at its upper end, few centimeters at its lower end which is known to be the main scale. The main scale can be seen on the solid L shape frames, on which the cm. markings are divided into 20 parts so that a small division can be equal to 0.05 cm. This is what allows improvements in the popularly used measuring techniques along with the direct measurements using the line graduated method.
2. Vernier Scale: ( Parts of Vernier Caliper )
There is one more, small rectangular metal strip which is graduated along with a special relation to a main scale which is termed as the Vernier scale and slides over this long metal strip when it has a jaw that is similar to that of the main scale. There are two jaws which are found on the Vernier caliper one is the upper jaw and other is the lower jaw. These are the jaws which are used together to hold the object tightly during the measurement of its length which is impossible using a meter scale.
The external jaw which is also known as the lower jaws is generally used to measure the diameter of a sphere or a cylinder whereas the internal jaws or the upper jaws are the ones which are generally used to measure the internal diameter of a hollow cylinder. There is a metal strip observed which is attached at the back of the Vernier caliper and is helpful in measuring the internal depth of a cylinder.
The Principle of Vernier Caliper
A scale cannot measure objects which are smaller than 1mm whereas a Vernier caliper can measure objects up to 1mm. As is well known by that the Vernier caliper is found having two scales the main scale and the Vernier scale, both of this make an arrangement to measure very small lengths like that of 0.1mm and so on. The main scale is found having the least count of 1mm whereas the Vernier scale has the least count of 0.9mm. 10 units of the main scale is equivalent to 1cm whereas 10 units of Vernier scale is equivalent to 0.9mm.
The unit of the Vernier scale is millimeter. This is termed as the main difference within the main scale and the Vernier scale which is 0.1 mm and is also referred to as the working principle of the Vernier caliper.
Least Count Of A Vernier Caliper
The difference within the values of one main scale division and that of a Vernier scale division is referred to as the least count of the Vernier caliper. The least count of Vernier caliper is referred to as the smallest value which can be measured from this instrument. In order to calculate the least count of a Vernier caliper, the value of one main scale division needs to be divided by the total number of division present on the Vernier scale.
